Building a $21 smart-home display with a Cheap Yellow Display and openHASP
tldrA $21 ESP32 touchscreen, ESPHome's LVGL that refused to calibrate, and openHASP as the rescue. A weekend project that wasn't, and what I learned about running resistive-touch panels on Home Assistant.
So I bought one of those cheap ESP32 touchscreen displays off Amazon (this exact one). You’ve probably seen them floating around the Home Assistant subreddit, people call them “Cheap Yellow Displays” or CYDs. The original idea was actually to show my driveway camera feed on it whenever motion was detected. Like a little security monitor by the door. Turns out the ESP32 without PSRAM can’t decode camera streams at all, so that plan died pretty quick. I pivoted to a light control panel with temperature readings instead, which honestly turned out to be more useful day to day.
It should have been a weekend project. It was not.
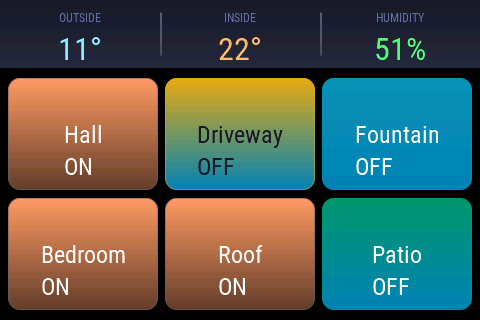
The actual display right now. 11 degrees outside, 22 inside, and I can control every light from here.
The specs that matter: ESP32-WROOM-32E with no PSRAM, 4MB flash, ST7796S display at 480x320, and an XPT2046 resistive touchscreen (this becomes important later). The board is pin-compatible with the Sunton ESP32-3248S035R, which matters when picking firmware builds.
First try: ESPHome with LVGL
My first instinct was ESPHome. It talks to Home Assistant natively, the community is huge, and LVGL support landed not too long ago. Seemed like the obvious choice.
Getting the display working was actually pretty smooth. You set up the SPI bus, point it at the right pins, and LVGL renders your UI:
spi:
  - id: shared_spi
    mosi_pin: GPIO13
    miso_pin: GPIO12
    clk_pin: GPIO14

display:
  - platform: ili9xxx
    model: ST7796
    spi_id: shared_spi
    cs_pin: GPIO15
    dc_pin: GPIO2
    data_rate: 80MHz
    dimensions:
      width: 480
      height: 320
    transform:
      swap_xy: true
I built a simple UI with two toggle buttons (Bedroom, Driveway), a WiFi signal indicator, and an IP address label. The LVGL widgets are defined in YAML and it all looks pretty clean:
lvgl:
  buffer_size: 10%
  pages:
    - id: main_page
      widgets:
        - button:
            id: light_btn
            width: 140
            height: 80
            checkable: true
            widgets:
              - label:
                  text: "OFF"
                  text_font: montserrat_28
            on_click:
              then:
                - homeassistant.service:
                    service: light.toggle
                    data:
                      entity_id: light.bedroom_light
Visually, it looked great. The problem started when I actually tried to touch the screen.
The touch calibration nightmare
The XPT2046 resistive touchscreen on this board is… something else. In ESPHome you calibrate it by setting static min/max values for X and Y coordinates:
touchscreen:
  - platform: xpt2046
    calibration:
      x_min: 200
      x_max: 3500
      y_min: 700
      y_max: 2700
    transform:
      swap_xy: true
      mirror_x: true
I must have tried every possible combination of those values, plus every permutation of swap_xy, mirror_x, and mirror_y. Nothing worked consistently. I’d tap “Bedroom” and the display would think I tapped “Driveway”. Tap the top of the screen, register at the bottom.
To figure out what was going on, I added raw coordinate logging:
on_touch:
  then:
    - lambda: |-
        ESP_LOGI("touch", "x=%d, y=%d, x_raw=%d, y_raw=%d",
          touch.x, touch.y, touch.x_raw, touch.y_raw);
The raw values were all over the place. Same spot on the screen would give different numbers depending on how hard I pressed, what angle my finger was at, whether Mercury was in retrograde. Resistive panels need proper multi-point calibration and ESPHome just doesn’t have that. You hardcode numbers and hope.
I spent days on this. Tried different calibration ranges, different transform combos, even started looking into writing a custom calibration component. Eventually I had to admit this wasn’t going to work.
Second try: openHASP
After too many hours fighting touch coordinates, I found openHASP. It’s a firmware built specifically for ESP32 touchscreen displays, and the feature that sold me immediately: built-in on-screen touch calibration. You tap four crosshairs on the screen. Done. Saved to flash. Survives reboots.
Flashing the firmware
openHASP has a web flasher at nightly.openhasp.com. Since the Hosyond is pin-compatible with the Sunton board, I used the esp32-3248s035r build.
The process was straightforward:
- Plug in USB, hold the BOOT button while powering on
- Open Chrome, pick the COM port
- Select
esp32-3248s035r, flash the 4MB image - Press RST
Two minutes, done. You can also do it from the terminal with esptool if you prefer:
esptool.py --port /dev/cu.usbserial-* erase_flash
esptool.py --port /dev/cu.usbserial-* write_flash 0x0 esp32-3248s035r_full_4MB.bin
Getting it on the network
After flashing, the device spins up its own WiFi access point (openHASP-XXXXXX). Connect to that from your phone, a captive portal pops up, punch in your WiFi credentials, and it joins your network.
Then you open its IP in a browser and configure MQTT. My setup:
- Broker:
192.168.8.126(my Home Assistant box) - Port:
1883 - Node name:
babydisplay
Everything between the display and Home Assistant goes over MQTT. No ESPHome API, no native HA integration. Just good old pub/sub.
Touch calibration (the 10 second fix)
This is the part that almost made me laugh after days of ESPHome calibration hell.
Go to Configuration, then Display, then hit Calibrate. Four crosshairs appear on the screen. Tap each one. Done. Calibration saved to flash, persists across reboots, and every single tap lands exactly where it should.
That’s it. That’s the whole solution to the problem I spent days on.
Building the UI
openHASP uses a JSONL file for the UI layout. One JSON object per line, each one describes a widget. It’s not as readable as YAML but it’s compact and you get used to it:
{"page":1,"id":20,"obj":"obj","x":0,"y":0,"w":480,"h":68,"bg_color":"#1A1A2E","radius":0}
{"page":1,"id":1,"obj":"label","x":5,"y":8,"w":150,"h":18,"text":"OUTSIDE","text_font":12,"text_color":"#6272A4"}
{"page":1,"id":2,"obj":"label","x":5,"y":26,"w":150,"h":38,"text":"--°","text_font":32,"text_color":"#8BE9FD"}
I went with a dark theme (Dracula-ish colors) and a grid of 6 toggle buttons. The layout:
- Top bar: Outside temp, Inside temp, Humidity
- Row 1: Hall, Driveway, Fountain
- Row 2: Bedroom, Roof, Patio
Each button type gets its own color when toggled on. Lights are amber, the fountain is cyan, roof is purple, patio is green. Makes it easy to read at a glance from across the room.
{"page":1,"id":4,"obj":"btn","x":8,"y":78,"w":150,"h":112,"toggle":true,
 "text":"\uE05B\nHall","text_font":24,
 "bg_color":"#16213E","bg_color10":"#E6A817",
 "text_color":"#8899AA","text_color10":"#1A1A2E",
 "radius":12,"border_width":1,"border_color":"#2A2A4A"}
The trick is bg_color10. That’s the color for the toggled-on state. openHASP handles the switching between on and off states automatically when the button is set to "toggle":true.
Upload the file with curl:
curl -F "[email protected];filename=/pages.jsonl" http://192.168.8.134/edit
Wiring it up to Home Assistant
openHASP has a custom component you install through HACS. Once that’s set up, the display auto-discovers through MQTT. The mapping between buttons and HA entities lives in a YAML file on the HA side:
babydisplay:
  objects:
    # Outside temperature from weather forecast
    - obj: "p1b2"
      properties:
        "text": >-
          {% set t = state_attr('weather.forecast_home', 'temperature') %}
          {{ t | round(0) if t is not none else '--' }}°

    # Hall light button
    - obj: "p1b4"
      properties:
        "val": "{{ 1 if is_state('light.smart_bulb_a19_led_3', 'on') else 0 }}"
        "text": >-
          {{ '\uE05B\nHall\nON' if is_state('light.smart_bulb_a19_led_3', 'on')
             else '\uE05B\nHall\nOFF' }}
      event:
        "down":
          - service: light.toggle
            entity_id: light.smart_bulb_a19_led_3
The naming convention is p1b4 for page 1, button 4. Properties use Jinja2 templates to pull state from HA entities, and events fire HA services when you tap buttons. Deploy with scp and a restart:
scp openhasp.yaml [email protected]:/config/openhasp.yaml
ssh [email protected] "ha core restart"
Things I wish I knew earlier
Start with openHASP if your display has resistive touch. If you see “XPT2046” in the specs, skip ESPHome and go straight to openHASP. You’ll save yourself a lot of frustration.
Keep the UI simple. With 4MB flash and no PSRAM, you can’t do camera feeds, big images, or fancy animations. Stick to buttons, labels, and icons. It’s a control panel, not an iPad.
MQTT is actually fine. I was initially put off by openHASP using MQTT instead of a native HA connection. Turns out it’s rock solid and has a nice side benefit: you can debug everything with any MQTT client.
Color-code by device type. Using different toggle colors for different kinds of devices (amber for lights, cyan for water features, purple for accent lighting) makes the display useful from across the room. You can tell at a glance what’s on without reading the text.
What it cost
| Item | Cost |
|---|---|
| Hosyond 4” ESP32 display | ~$21 |
| USB-C cable | already had one |
| Time lost to ESPHome touch calibration | let’s not talk about it |
| Total | ~$21 |
This whole project was built alongside Claude Code as a copilot — I wrote about that workflow in part 2: managing Home Assistant from a terminal conversation with Claude.