Bridging a cloud-locked LED controller into Home Assistant, without new hardware
tldrPart 3 of my Home Assistant journey: a stubborn BanlanX LED controller that only spoke a phone-app dialect, a Mac that already had the Bluetooth radio I needed, and 150 lines of Python that taught Home Assistant to talk to it over MQTT.

This is part 3 of my Home Assistant journey. In part 1 I turned a $21 ESP32 touchscreen into a wall panel. In part 2 I started running the whole smart home from a terminal conversation with Claude. This one is about a stubborn little LED controller that refused to be integrated, and the slightly ridiculous lengths I went to so it would join the family anyway.
The short version: I have a cheap CCT (tunable-white) LED controller called an SP542E. It does Bluetooth and Wi-Fi, but only through its own phone app. No Home Assistant integration, no local API, nothing. I got it working in Home Assistant (full on/off, brightness, and color temperature) without buying a single new part. The whole thing runs as a tiny Python service on my Mac.
Here’s the story, dead ends included. Those were the interesting part.
The problem
The SP542E is one of those generic LED controllers you buy with a strip kit (this is the exact one I have, about $13, and it even came with a little handheld remote). It’s controlled by an app (sold under names like “iDeal LED”, “LED Chord”, and “BanlanX”). So it shipped with two ways to control it, the app and the remote, and neither was the one I wanted: there’s no official way to get it into Home Assistant.
Normally the answer is “flash WLED” or “buy a controller that speaks a known protocol.” But I wanted to see if I could make this one work, as-is.
The constraint that shaped everything
My Home Assistant runs in a VirtualBox VM on a Mac. That detail matters more than anything else in this post.
A VM doesn’t get Bluetooth. VirtualBox USB passthrough on macOS is famously flaky, and even if I fought it into working, the Bluetooth range would be wherever my Mac happens to sit. So Home Assistant simply cannot reach a Bluetooth device directly.
There are a few standard ways to give a Bluetooth-less server a radio (I’ll get to that shopping list in a minute), but I had a cheaper realization first:
Home Assistant has no Bluetooth. But the Mac it runs on has perfectly good Bluetooth.
So instead of adding hardware, I could run a small bridge on the Mac: it talks to the LED controller over Bluetooth on one side, and talks to Home Assistant over the network on the other. The Mac becomes the radio.
The architecture
The cleanest way to connect the two sides turned out to use stuff I already had. Home Assistant already runs a Mosquitto MQTT broker (my wall display uses it). MQTT has an auto-discovery feature: publish a specially-formatted message and an entity just appears in Home Assistant, no config editing required.
So the design is:
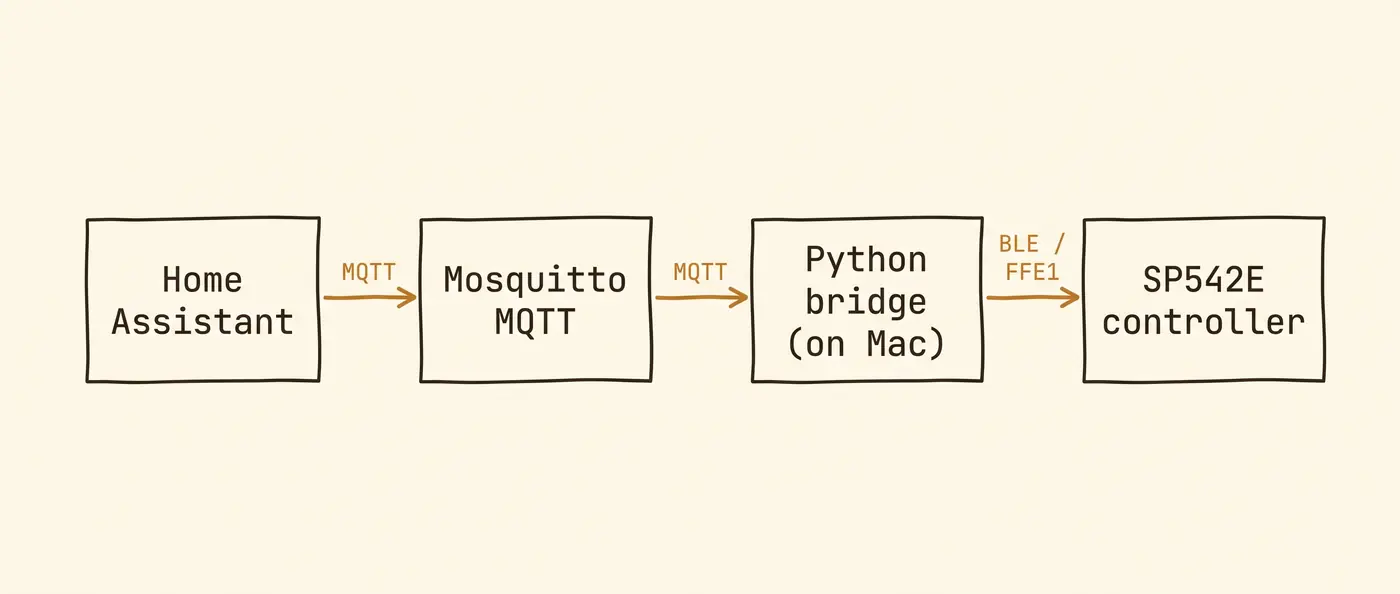
The Python bridge:
- Connects to the LED controller over Bluetooth
- Connects to the MQTT broker and announces a light entity via discovery
- Translates Home Assistant commands (on/off, brightness, color temp) into Bluetooth commands
- Reconnects automatically when anything drops
Home Assistant just sees a normal light called light.bed_roof. It has no idea there’s a Mac and a Bluetooth stack involved.
”Why not just buy a Bluetooth radio?”
Fair question. There are good hardware options; I weighed three before going software.
An ESP32 Bluetooth proxy (~$5) is the canonical answer. You flash a cheap board with ESPHome’s bluetooth_proxy firmware, plug it in anywhere, and it shows up in Home Assistant as a remote radio over Wi-Fi. With a houseful of Bluetooth sensors, this is what I’d reach for. But a proxy only gives HA a radio, not understanding: it shuttles bytes without knowing what they mean, and HA can only act on a proxied device it already has an integration for. HA didn’t understand my SP542E, so a proxy alone would have changed nothing about the hard part.
A USB Bluetooth dongle (~$5) gives the HA machine a local radio. Cheap, except mine runs in a VirtualBox VM, and USB passthrough on macOS is fragile and breaks on host sleep. (I also burned an evening on a spare mini-PC whose built-in radio wouldn’t enumerate at all. Rabbit hole.)
The software bridge on the Mac ($0) won by default: the Mac was already on 24/7, already had a working radio, already ran the Home Assistant VM and its MQTT broker, and was already in range. The tradeoff is that the light only works while the Mac is awake. Fine for an always-on desktop, less so for a laptop that travels.
Whichever radio you pick, you still have to teach Home Assistant the device’s command language. The radio only carries the bytes; it doesn’t speak them.
A macOS gotcha: Bluetooth only works “in person”
First snag. I was driving all of this from a terminal over SSH, and every Bluetooth scan came back “not authorized.”
It turns out macOS only grants Bluetooth access to processes running in the logged-in GUI session. An SSH session can’t touch CoreBluetooth no matter what you toggle in System Settings. The fix was simply to run the scripts from a Terminal window sitting at the actual Mac, where macOS pops the “allow Bluetooth?” prompt and remembers it.
Mildly annoying, completely logical in hindsight.
Finding the device
A quick Bluetooth scan turned up the controller advertising itself as “BedRoof” (a name I’d set in the app long ago), with a strong signal. Connecting and dumping its services showed a single, classic layout: one service, one characteristic (FFE1) that supports both writing and notifications. That’s the textbook “serial over Bluetooth” setup these cheap modules use.
Now I just had to figure out what bytes to send it.
A two-minute primer on BLE serial (expand if "one service, one characteristic" doesn't already mean something to you)
Every Bluetooth Low Energy device exposes a little menu of its capabilities called a GATT table: the device has services (logical groupings), and each service contains characteristics (the actual data endpoints). A characteristic is the thing you interact with: you can read it, write to it, or subscribe to it so the device pushes updates (notifications). A fitness band might have a “heart rate” service with a “measurement” characteristic; a thermometer might have a “temperature” characteristic.
The cheap LED controller had none of that nice structure. One custom service, one characteristic (FFE1) supporting both writing and notifications. That pattern is the signature of a BLE serial module: the HM-10 chip and its many clones.
BLE serial is a clever hack. Bluetooth LE wasn’t designed to be a serial cable; manufacturers wanted a cheap “just send my microcontroller some bytes over Bluetooth” pipe, so these modules repurpose a single characteristic into a transparent UART. Whatever bytes you write to FFE1 get handed straight to the microcontroller, as if down a serial wire. Whatever it wants to say back comes as notifications on the same characteristic.
The crucial consequence: Bluetooth imposes no meaning on those bytes. The transport just shuttles them. The command language (what 53 50 00 01 00 01 01 means, what order to send things in, whether there’s a checksum) is entirely invented by the device’s firmware. So discovering FFE1 told me “this is a byte pipe to a microcontroller,” and nothing about the language that microcontroller speaks. That language was the actual puzzle.
One more practical detail: BLE writes come in two flavors, write-with-response (acknowledged) and write-without-response (fire-and-forget). Some devices accept both; some only honor one. Guess wrong and your perfectly-formed commands vanish into the void. Which, foreshadowing, is exactly what happened to me.
The protocol detective story
The characteristic was there. The connection worked. But what language did it speak?
Wrong guess #1: the AES protocol. There’s a well-documented reverse-engineering project for “iDeal LED” devices that uses AES encryption on a different service. I got excited, until I noticed my device didn’t have that service at all. Different beast.
Wrong guess #2: the plaintext “LED-BLE” protocol. Lots of these FFE1 controllers use a simple 7E ... EF framed command format. Power on is 7e ff 04 01 ff ff ff ff ef, and so on. I built a whole probe around it, fired the commands at the strip… and nothing happened. The Bluetooth writes were accepted, but the light just sat there, indifferent.
That “accepted but ignored” behavior is a useful clue: you’re talking to the right characteristic but speaking the wrong dialect.
The breakthrough: read the nameplate. The device’s Bluetooth advertisement included a manufacturer ID of 0x5053. In decimal that’s 20563, a number registered to BanlanX, the company behind the app. So this wasn’t a generic controller at all. It was a BanlanX device using BanlanX’s own protocol.
There’s a community Home Assistant integration called UniLED that supports a long list of BanlanX controllers. I dug into its source and found three different BanlanX protocol families, each with completely different command framing.
Wrong guess #3: BanlanX “v2”. The first family uses commands prefixed with 0xA0. Power off is A0 62 01 00. I tried it. Still nothing, though I did learn one important thing from UniLED’s code: these devices require acknowledged Bluetooth writes (write-with-response). I’d been firing off unacknowledged writes the whole time, which was a second reason for the silence.
Finally, the match. UniLED identifies devices by the data in their Bluetooth advertisement. The newest family (“6xx”) expects manufacturer data starting with [model_id, 0x10]. My device’s data started with 5d 10. That 10 was the tell. My controller was a BanlanX 6xx-family device, model id 0x5d.
That family wraps commands like this:
53 <command> 00 01 00 <length> <payload...>
Plaintext, header byte 0x53 (the letter ‘S’), no encryption.
The moment it answered back
The best moment of the project: I sent a “state query” (53 02 00 01 00 01 01) as an acknowledged write, and the device replied. Seventeen notification packets came streaming back. And buried in the bytes was readable ASCII:
V3.0.19, the firmware version- the device’s network name
After three wrong protocols, the thing was finally talking to me. From there the rest fell into place fast:
- Power:
53 50 00 01 00 01 01(on) /...00(off) - Switch to static-white mode:
53 53 00 01 00 02 02 01 - Color temperature:
53 61 00 01 00 02 <cold> <warm> - Brightness:
53 51 00 01 00 02 01 <level>
I ran a little sequence (power on, warm white, cool white, dim, bright) and watched the strip obediently follow along. Cracked.
Building the bridge for real
With the protocol known, the bridge itself was straightforward. It’s about 150 lines of Python using two libraries: bleak for Bluetooth and aiomqtt for MQTT. On startup it publishes an MQTT discovery message describing a color-temperature light, then it sits in a loop translating incoming Home Assistant commands into those 53 ... byte frames. The whole thing, including the 53 ... command map and the LaunchAgent setup, is on GitHub: xydac/sp542e-ha-bridge.
The first time I toggled it from the Home Assistant app and the bedroom lights responded, with zero new hardware in the loop, was the payoff.
A couple of niceties I added:
- Always-on. I wrapped it in a macOS LaunchAgent so it starts at login and restarts if it ever crashes. Since my Mac is an always-on desktop, the light is always controllable.
- It works headless. I’d worried the background service wouldn’t get Bluetooth permission, but once it’s granted to the Python binary, the LaunchAgent inherits it. Confirmed by watching it connect and write with nothing running in a terminal.
One small cleanup: Home Assistant initially named the entity light.bed_roof_bed_roof (it concatenated the device name and the entity name, both “Bed Roof”). A quick entity-registry rename fixed it to a clean light.bed_roof.
Putting it on the wall
The last touch was wiring it into the physical wall display I built earlier, the little ESP32 touchscreen running openHASP. I swapped one of the existing buttons (it used to control a hall light I don’t really use that way anymore) to toggle the new bed light instead, relabeled it, and shuffled another button’s label to match how the rooms are actually used now. Deploy the config, restart, reboot the display, done.
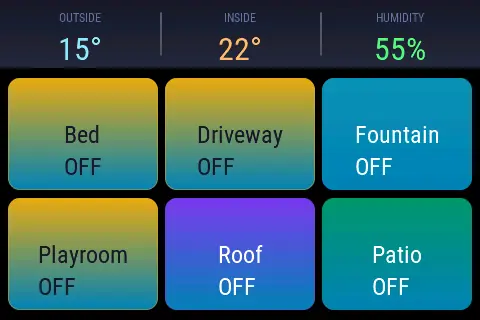
Now there’s a physical button on the wall that turns on a light the manufacturer never intended Home Assistant to touch.
What I took away from this
Three things that outlast this particular light:
- Put the bridge where the radio is. Don’t fight a server that can’t reach the device; move the integration to hardware that can.
- The advertisement is the nameplate. For cheap BLE gadgets, the manufacturer ID is often the fastest path to the right protocol. I guessed for hours before reading the label.
- Failures are signal. “Accepted but ignored” meant right characteristic, wrong dialect; the silence was actually two bugs stacked.
The controller that “couldn’t” be integrated now turns on with a tap on the wall, a voice command, or an automation, same as everything else in the house. No new hardware, just a little persistence and a Mac that was already sitting there anyway.
Like the rest of this series, the research, the protocol sleuthing, the Python, and the deployment all happened in a terminal conversation with Claude Code.